Introduction
This article explains all the steps in the data flow for creating a Datylon chart in an efficient way. Some steps are mandatory (Importing and Binding) others are optional or depend on the type of chart one wishes to create.
The 4 steps in the data flow are:
1. Preparing the data
Input data structure
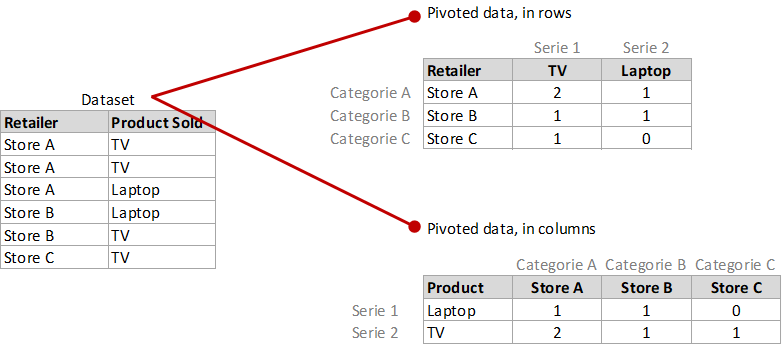
Depending on the chart type, the data should be structured as a flat table or a pivot table.
See below a flat table on the left and on the right pivot table structured in rows and columns.
Match data with chart type
The data should match the chart type one wants to create. Some charts support multiple series or require at least 2 columns/rows. A scatter plot for instance needs at least 2 columns or rows with xy coordinates, or a bullet chart requires a very specific structure. Entering wrong data will result in error messages.
To find out the correct required data structure for a certain chart type, create a default chart of the wanted type and check the data structure in the Data sheet manager.
More information on how the data should be structured for specific charts can be found in the the "How to create a ........ chart" tutorials in the Help Center, or samples can be downloaded from the Datylon Inspiration page.
What you see is what you get
When data is copied or imported from other spreadsheets, the data is imported as it is presented in the spreadsheet. Meaning with the same number of digits, the same decimal and thousand separator, currency, percentages, etc.. The possibly underlying formulas are not copied or imported to the Datylon data sheets.
Although this can be set and changed in the Datylon panel as well, it is more efficient to format the data correctly beforehand during preparation.
If you enable Allow Data Cropping in a numerical or datetime axis property pane (Styling > Axis X/Y > Allow Data Cropping), you can limit the data range. This may cause distortion of the data representation.
2. Entering or importing data
Every Datylon chart is connected to a Datylon data sheet. When drawing a chart box and selecting one of the default charts, dummy data is loaded in the data sheet. This dummy data should be replaced by your data.
Enter new data in a Datylon data sheet
Enter the data in the active data sheet. A data sheet is active when one chart linked to that data sheet is selected.- Type the data straight in the active data sheet
- Copy & paste the data directly in the active data sheet
For the next options it is useful to understand the following definitions:
- Source workbook: is a local or online workbook (a File, Datylon online workbook or Google Sheets) that is used to retrieve data from.
- Destination workbook: is the workbook in the Datylon Data manager list which is selected and receives the data or data sheets.
Import new workbooks in the Datylon Data manager
This feature copies the data sheets from a source workbook to a new workbook in the data manager (the destination workbook).- From a local file: Manage data > Add > File (CSV*, XLS, XLSX)
* a CSV can only contain one data sheet, which is always imported as Sheet1. - From Datylon online workbook: Manage data > Add > Datylon Workbook**
** a Datylon workbook is an online workbook stored in Datylon Report Studio under Docs > Workbooks - From Google Sheets: Manage data > Add > Google Sheets
This allows you to refresh the data using the refresh button. See Data link below.
Import new sheets in a selected workbook
This feature imports all the data sheets from a selected source into a selected workbook in the Datylon Data manager list.The link with the original data source is not kept.
- From a local file: Manage data > "Tree dots" icon > Add sheets from > File (CSV, XLS, XLSX)
- From a Datylon workbook: Manage data > "Tree dots" icon > Add sheets from > Datylon workbook
- From Google Sheets: Manage data > "Tree dots" icon > Add sheets from > Google Sheets
3. Update data using Swap workbook
Besides just editing or copying the data straight in the active data sheets, there are 2 ways to swap data in data sheets which are linked to charts:
- Swap workbook
- Swap data sheet
Swap workbook
- If the source workbook contains more data sheets than the destination workbook, they will be added to the destination workbook.
- If the destination workbook contains data sheets not linked to a chart, and are not present in the source workbook, those data sheets will be deleted from the destination workbook without warning.
- The link with the original source file is not kept. If the original source workbook is updated, swap workbook has to be performed again.
Swap workbook options:
- From a local file: Manage Data > "Swap workbook" icon > File (CSV, XLS, XLSX).
- From Datylon online workbook: Manage Data > "Swap workbook" icon > Datylon Workbook
Swap datasheet
Loads new data in one selected data sheet from another source.
The link with the original source file is not kept. If the original source sheet is updated, swap datasheet has to be performed again.
Swap data sheet options:
- To a local file: go to Manage Data > Swap > Import File
- To a Datylon online sheet: go to Manage Data > Swap > Online Sheet
- To an empty sheet: go to Manage Data > Swap > Empty Sheet
The result of data update using swap workbook might differ from direct copy/paste, as the data updated using swap workbook can contain the local format setting. To make the result consistent between different import options use the same forced formatting.
4. Update data using Data link
A data link is a permanent link to an online source workbook (Google Sheets).
To be able to set up a data link with an online workbook, the online workbook has first to be shared for general access to "Anyone with the link can view".
The data in the destination workbook is not updated automatically. Only when the Refresh button is clicked the data is fetched from the online source workbook.
Create a Data link
Start in Google Sheets with sharing the online workbook for general access to "Anyone with the link can edit".
The data link is only successful in case the source workbook contains at least all the data sheets, and with exactly the same names, as the data sheets linked to a chart in the destination workbook.
- If the source workbook contains more data sheets than the destination workbook, they will be added to the destination workbook.
- If the destination workbook contains data sheets not linked to a chart, and are not present in the source workbook, those data sheets will be deleted from the destination workbook without warning when doing a refresh.
Create a data link options:
Google Sheets: Manage Data > "Swap workbook" icon > Create data link > Google SheetsRefresh a data link
Go to Manage Data > "Refresh" icon to the right of the workbook name
It can take up several seconds before changes in a Google Sheets workbook are ready for refresh. Please wait for "Saved to Drive" notification in the Google Sheets header menu before refreshing.
Details on how to import and manage data can be found in the article Data management in Datylon.
5. Input formatting of the data
Incoming data can be formatted as Text, Numbers or Date & Time in the Formatting tab of the Datylon panel. Input formatting of the data is optional and set per column/row. There are 3 format types:
- Text
- Numbers
- Date & Time
Formatting is required for:
Click on the links above to learn about the details.
6. Binding the data
Data binding is the mandatory step to connect the data as columns or row to categories, series, or data marks (e.g. bars or bubbles). The binding options depend on the type of chart.
In the Datylon panel, the data binding features can be found in the property pane under the Binding tab and its 2 sections Dataset and Series.
Bindings tab > Dataset
- Enable/disable First row of datasheet are headings
- Data is structured in Rows/Columns
Bindings tab > Series
Here the actual binding of the data with the chart objects and properties occurs. Select the wanted column or row in the drop down box for the appropriate property.
Except for a Datylon Text object, every Datylon chart requires minimum 2 properties that need to bound:
- A position over the X-axis (X) or a some kind of a category (Category).
- A position of the Y-axis (Y) or a numerical value (Value)
Some chart types allow you to add more series. Click on the + sign to do so. See more details about working with series in this article.
On top of the mandatory properties, data can also be bound to colors and other properties using reference codes in the data (read here), or color palettes read in this article.
Done!
After you have successfully imported and bound your data, you can start styling your chart.